본 절은 [데이터 로깅] 아두이노 쉴드를 사용하기 위해 알아야 할 내용과 실습 방법에 대해 설명한다. 아두이노 쉴드의 특징, 동작원리, 사양, 연결 핀 배열, 출력 값, 주의사항을 알아본다. 아두이노와 를 연결하고, 간단한 코딩으로 를 쉽게 실습할 수 있다.
목차
[아두이노 쉴드] Data logger shield sd card and real time clock

데이터 로깅 쉴드란?
실시간 클럭(RTC)가 포함되어 있으며, 메모리에 쉽게 저장할 수 있는 아두이노 쉴드이다.
배터리는 CR1220을 사용한다.
- SD card interface works with FAT16 or FAT32 formatted cards.
- 3.3V level shifter circuitry prevents damage to your SD card.
- Real time clock (RTC) keeps the time going even when the Arduino is unplugged.
- Prototyping area for soldering connectors, circuitry or sensors.
- Onboard 3.3V regulator is both a reliable reference voltage and also reliably runs SD cards that require a lot of power to run.
- Works with Arduino UNO, Duemilanove, Diecimila, Leonardo or ADK/Mega R3 or higher.
- ADK/Mega R2 or lower are not supported.
- DS1307 RTC
- Size: 68 x 53 x 23mm (approx)
- Regulator voltage: 3.3V
- Battery: CR1220 3V
데이터 로깅 아두이노 쉴드 특징
데이터 로깅 의 특징은 다음과 같다.
-SD카드 인터페이스는 FAT16 또는 FAT32 포맷된 카드와 함께 작동한다.
-3.3 v 레벨 시프터 회로는 SD 카드에 손상을 방지한다.
-실시간 클럭 (rtc) 는 arduino가 연결되지 않은 경우에도 시간을 유지한다.
- 배터리 백업은 수년간 지속된다.
-SD 및 RTC 모두의 라이브러리 및 예 코드를 포함하고 있으며, 납땜 커넥터, 회로 또는 센서에 대한 프로토 타이핑 영역을 신속하게 진행할 수 있다.
-Arduino uno, duemilanove, diecimila, leonardo 또는 adk/mega r3 이상 작동한다.
-Adk/메가 r2 또는 더 낮은 지원되지 않는다.
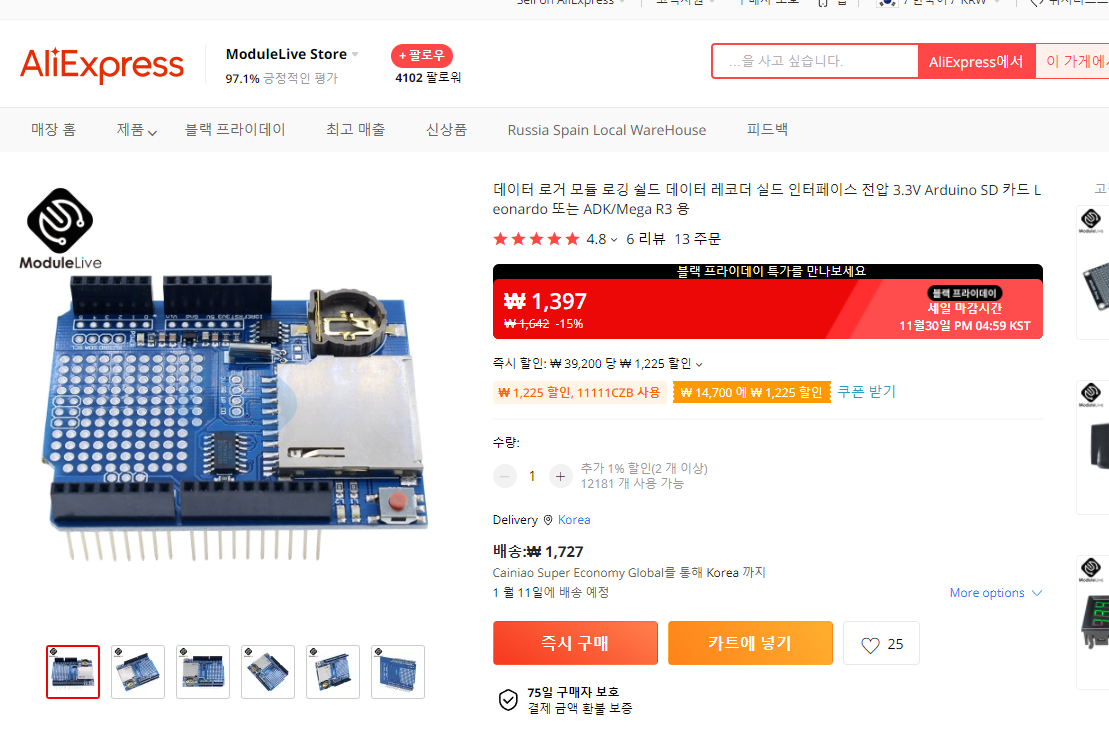
데이터 로깅 쉴드 구입하기
[데이터 로깅 쉴드]는 알리익스프레스, 네이버 쇼핑몰, 아마존 등에서 를 구입할 수 있다
알리익스프레스에서 다음과 같이 구입할 수 있다.
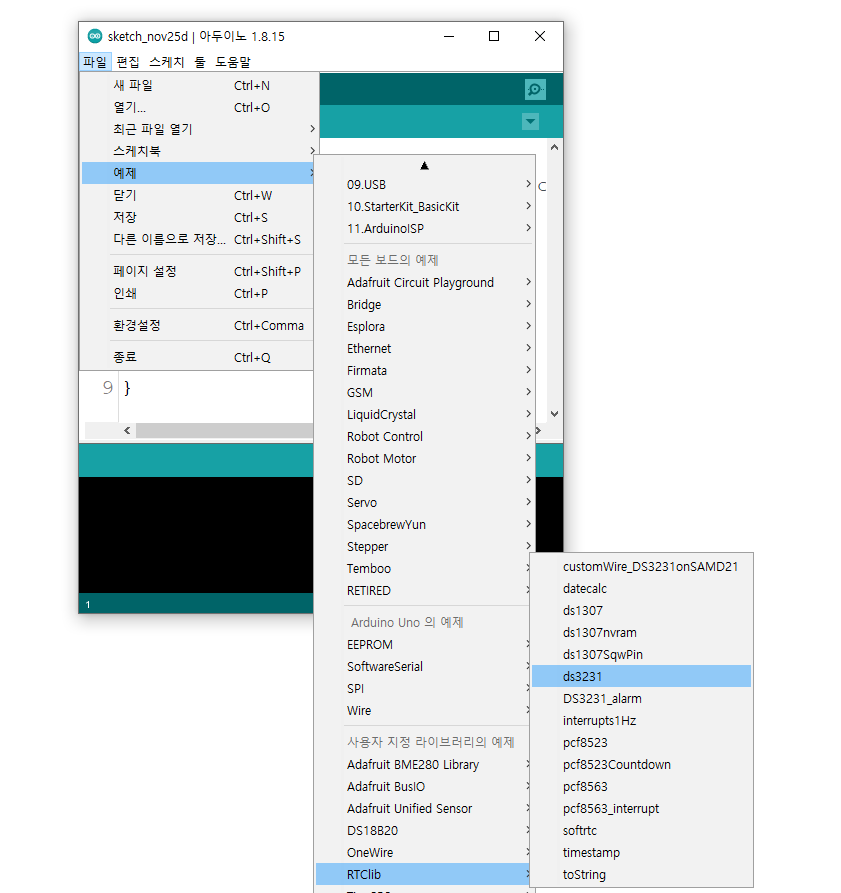
데이터 로깅 라이브러리 다운로드
라이브러리르 설치한다.
https://github.com/adafruit/RTClib
GitHub - adafruit/RTClib: A fork of Jeelab's fantastic RTC library
A fork of Jeelab's fantastic RTC library. Contribute to adafruit/RTClib development by creating an account on GitHub.
github.com

데이터 로깅 소프트웨어 코딩(RTC)
하드웨어 연결이 완료되면, 아두이노 IDE를 이용해 아두이노 쉴드 소스코드를 코딩할 수 있다.
코드는 다음과 같다.
// Date and time functions using a DS1307 RTC connected via I2C and Wire lib
#include "RTClib.h"

RTC_DS1307 rtc;

char daysOfTheWeek[7][12] = {"Sunday", "Monday", "Tuesday", "Wednesday", "Thursday", "Friday", "Saturday"};

void setup () {
  Serial.begin(57600);

#ifndef ESP8266
  while (!Serial); // wait for serial port to connect. Needed for native USB
#endif

  if (! rtc.begin()) {
    Serial.println("Couldn't find RTC");
    Serial.flush();
    while (1) delay(10);
  }

  if (! rtc.isrunning()) {
    Serial.println("RTC is NOT running, let's set the time!");
    // When time needs to be set on a new device, or after a power loss, the
    // following line sets the RTC to the date & time this sketch was compiled
    rtc.adjust(DateTime(F(__DATE__), F(__TIME__)));
    // This line sets the RTC with an explicit date & time, for example to set
    // January 21, 2014 at 3am you would call:
    // rtc.adjust(DateTime(2014, 1, 21, 3, 0, 0));
  }

  // When time needs to be re-set on a previously configured device, the
  // following line sets the RTC to the date & time this sketch was compiled
  // rtc.adjust(DateTime(F(__DATE__), F(__TIME__)));
  // This line sets the RTC with an explicit date & time, for example to set
  // January 21, 2014 at 3am you would call:
  // rtc.adjust(DateTime(2014, 1, 21, 3, 0, 0));

  Serial.println("Done");
}

void loop () {
    DateTime now = rtc.now();

    Serial.print(now.year(), DEC);
    Serial.print('/');
    Serial.print(now.month(), DEC);
    Serial.print('/');
    Serial.print(now.day(), DEC);
    Serial.print(" (");
    Serial.print(daysOfTheWeek[now.dayOfTheWeek()]);
    Serial.print(") ");
    Serial.print(now.hour(), DEC);
    Serial.print(':');
    Serial.print(now.minute(), DEC);
    Serial.print(':');
    Serial.print(now.second(), DEC);
    Serial.println();

    Serial.print(" since midnight 1/1/1970 = ");
    Serial.print(now.unixtime());
    Serial.print("s = ");
    Serial.print(now.unixtime() / 86400L);
    Serial.println("d");

    // calculate a date which is 7 days, 12 hours, 30 minutes, and 6 seconds into the future
    DateTime future (now + TimeSpan(7,12,30,6));

    Serial.print(" now + 7d + 12h + 30m + 6s: ");
    Serial.print(future.year(), DEC);
    Serial.print('/');
    Serial.print(future.month(), DEC);
    Serial.print('/');
    Serial.print(future.day(), DEC);
    Serial.print(' ');
    Serial.print(future.hour(), DEC);
    Serial.print(':');
    Serial.print(future.minute(), DEC);
    Serial.print(':');
    Serial.print(future.second(), DEC);
    Serial.println();

    Serial.println();
    delay(3000);
}
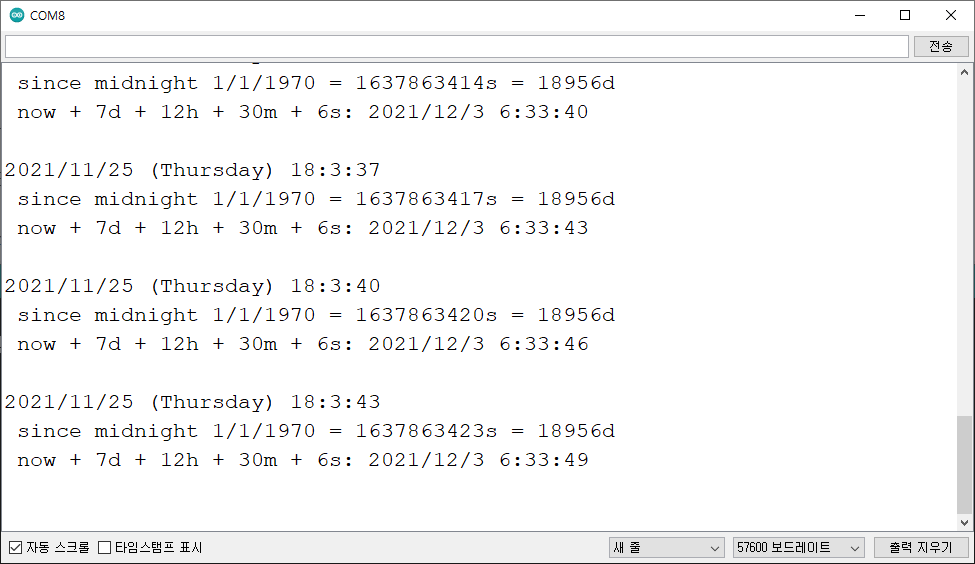
#1 예제 : 데이터 로깅 동작확인 (RTC)
하드웨어 연결, 소프트웨어 코딩이 완료되면 다음과 같이 동작 화면을 확인할 수 있다.
------------------------------------------------------
개발환경 : WINDOWS 10
아두이노 IDE : 1.8.13
------------------------------------------------------
01 연결
- 아두이노와 PC 연결
- 아두이노 IDE 실행
- 메뉴 → 툴 → 보드:아두이노 UNO 확인
- 메뉴 → 스케치 → 확인/컴파일
02 컴파일 확인
스케치>확인/컴파일(CTRL+R) 를 선택해서 컴파일을 진행한다.
03 아두이노 우노 업로드
컴파일이 이상없이 완료되면 스케치>업로드(CTRL+U) 를 선택해서 컴파일 파일을 업로드 한다.

04 동작 확인
다음과 같이 동작을 확인할 수 있다.
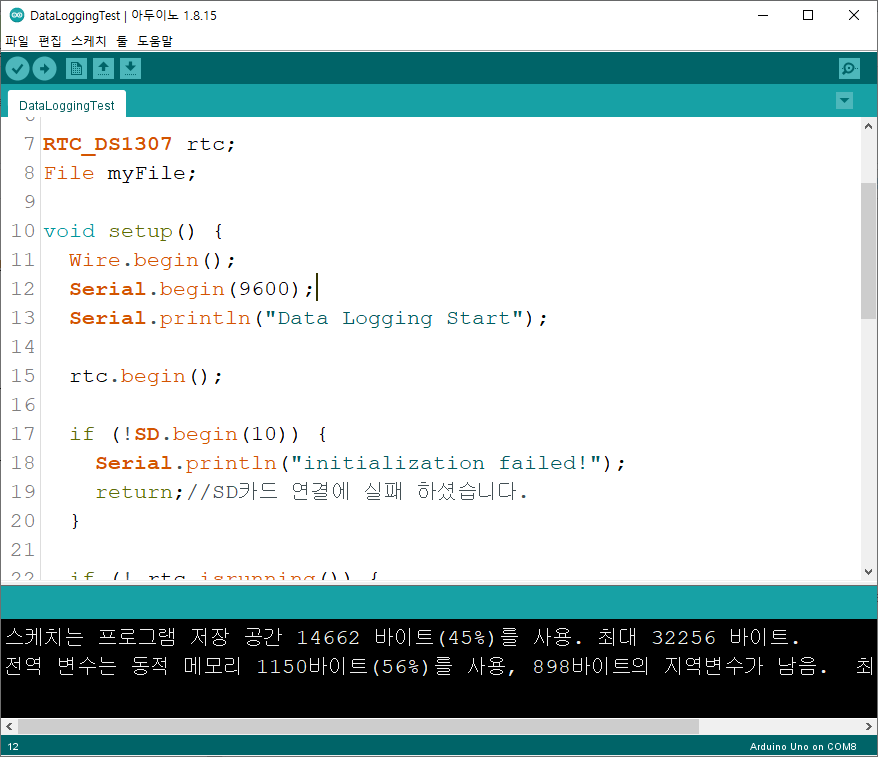
#2 예제 - 데이터 로깅 동작확인 (RTC+SD 카드)
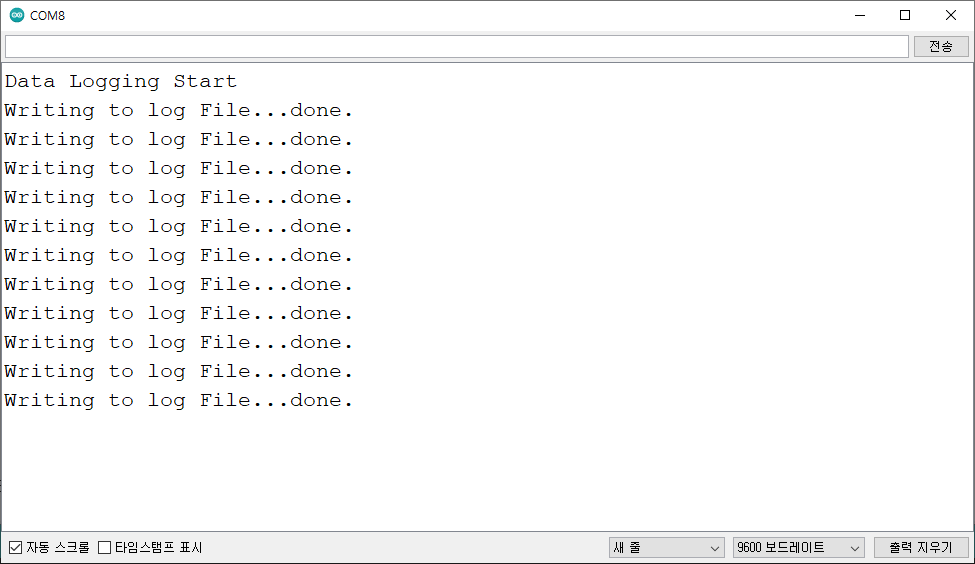
다음과 같이 RTC 시계정보를 SD 카드에 저장할 수 있다.
(1) 소스를 코딩한다.
#include <SPI.h>
#include <SD.h>
#include <Wire.h>
#include "RTClib.h"


RTC_DS1307 rtc;
File myFile;

void setup() {
  Wire.begin();
  Serial.begin(9600);
  Serial.println("Data Logging Start");

  rtc.begin();

  if (!SD.begin(10)) {
    Serial.println("initialization failed!");
    return;//SD카드 연결에 실패 하셨습니다.
  }

  if (! rtc.isrunning()) {
    Serial.println("RTC is NOT running!");
    rtc.adjust(DateTime(F(__DATE__), F(__TIME__)));
  }
}


void loop() {
  DateTime now = rtc.now();
  myFile = SD.open("LogData.txt", FILE_WRITE);
  if (myFile) {
    Serial.print(F("Writing to log File..."));
    myFile.print(now.day());
    myFile.print(",");
    myFile.print(now.hour());
    myFile.print(",");
    myFile.print(now.minute());
    myFile.print(",");
    myFile.print(now.second());
    myFile.print(",");
    myFile.println(analogRead(A0));
    myFile.close();
    Serial.println(F("done."));
  } else {
    Serial.println(F("error opening file!!"));
  }

  delay(1000);
}
(2) 컴파일후 업로드 한다.
(3) 시리얼 동작은 다음과 같다.
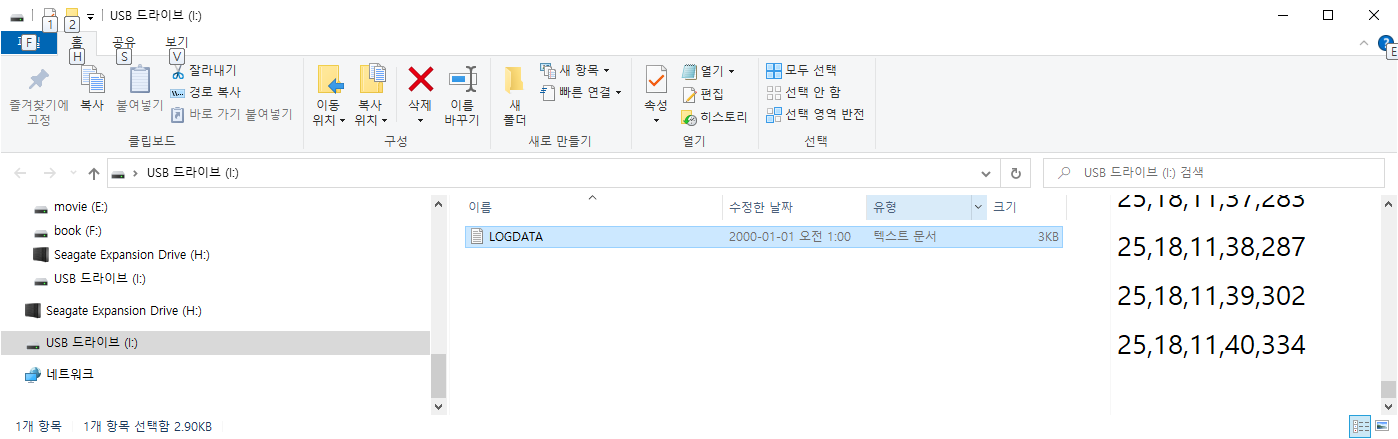
(4) LOGDATA 파일은 다음과 같다.
#3 예제 - 데이터 로깅 RTC 파일이름 (RTC+SD 카드)
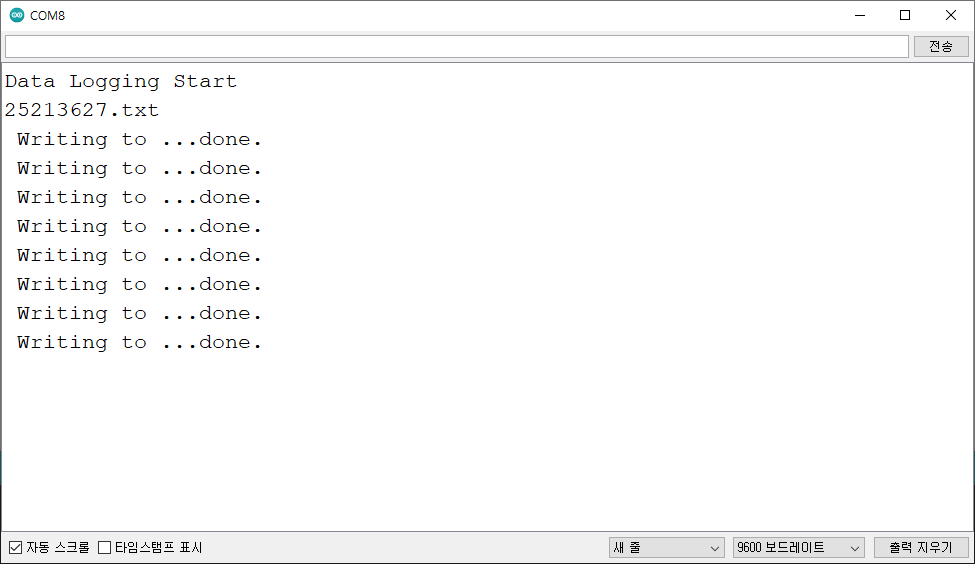
다음과 같이 RTC 시계정보를 이용해 SD 카드 저장 파일명을 시간에 따라 자동으로 변경되도록 설정할 수 있다.
void getFileName()
{
  DateTime now = rtc.now();
  delay(100);
  sprintf(filename, "%d%d%d%d.txt", now.day(), now.hour(), now.minute(), now.second());
  Serial.println(filename);
}
(1) 소스 코드를 작성한다.
#include <SPI.h>
#include <SD.h>
#include <Wire.h>
#include "RTClib.h"


char filename[50] = "log.txt";

RTC_DS1307 rtc;
File myFile;

void setup() {
  Wire.begin();
  Serial.begin(9600);
  Serial.println("Data Logging Start");

  rtc.begin();

  if (!SD.begin(10)) {
    Serial.println("initialization failed!");
    return;//SD카드 연결에 실패 하셨습니다.
  }

  if (! rtc.isrunning()) {
    Serial.println("RTC is NOT running!");
    rtc.adjust(DateTime(F(__DATE__), F(__TIME__)));
  }

  getFileName();
}


void loop() {
  char data[200] = {0};
  myFile = SD.open(filename, FILE_WRITE);
  if (myFile) {
    Serial.print(" Writing to ...");
    sprintf(data, "%s,%d", filename, 1);
    myFile.print(data);
    myFile.close();
    Serial.println(F("done."));
  } else {
    Serial.println(F("error opening file!!"));
  }

  delay(2000);
}

void getFileName()
{
  DateTime now = rtc.now();
  delay(100);
  sprintf(filename, "%d%d%d%d.txt", now.day(), now.hour(), now.minute(), now.second());
  Serial.println(filename);
}
(2) 컴파일후 업로드 한다.

(3) 시리얼로 확인한다.
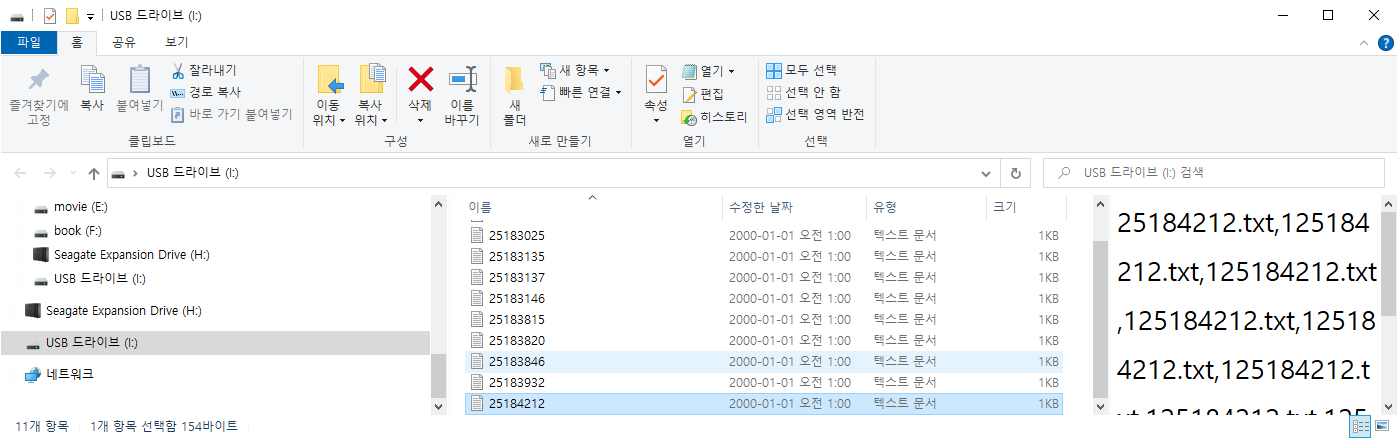
(4) SD 카드의 로그 파일을 확인한다.
마무리
아두이노와 데이터 로깅 를 연결하고, 간단한 코딩으로 를 쉽게 실습할 수 있다.
모두의 아두이노 환경 책
[모두의 아두이노 환경 ] 책은 예스24, 인터넷 교보문고, 알라딘, 인터파크도서, 영풍문고, 반디앤루니스 , 도서11번가 등에서 구입할 수 있다. 이 책에서는 PMS7003, GP2Y1010AU0F, PPD42NS, SDS011 미세먼지 , DHT22 온습도 , MH-Z19B 이산화탄소 , ZE08-CH2O 포름알데히드 , CCS811 총휘발성유기화합물 TVOC, GDK101 방사선(감마선) , MQ-131 오존(O3) , MQ-7 일산화탄소, MICS-4514 이산화질소 , MICS-6814 암모니아 , DGS-SO2 아황산가스(SO2) , BME280 기압 , GUVA-S12SD 자외선(UV) , MD0550 기류 , QS-FS01 풍속 (Wind speed) 를 사용한다.
모두의 아두이노 환경
아두이노와 로 내 건강을 지킬 수 있다!다양한 환경 를 실생활 프로젝트에 응용해보자!시중에 판매되고 있는 간이측정기도 로 값을 측정합니다. 똑같은 를 아두이노에 연결하
book.naver.com
'모두의 아두이노' 카테고리의 다른 글
| [아두이노] HC-06 블루투스 사용하기 (0) | 2021.12.02 |
|---|---|
| [아두이노] Keywish BLE-Nano for Arduino Nano V3.0 Mirco USB (0) | 2021.12.01 |
| [아두이노] TM1637-7세그먼트 (TM1637TinyDisplay) (0) | 2021.11.24 |
| [아두이노][쉴드] 아두이노 다기능 확장 쉴드 (0) | 2021.11.16 |
| [아두이노][센서] NEO-6M GPS 확장 쉴드 SD 카드 사용하기 (MicroSD) - ReadWrite 테스트 (0) | 2021.11.16 |


댓글